Create Admin Menus for WordPress
Let's see how to create a custom admin menu and page for our plugin.

# 1. Adding a menu item
The main thing to do is to call: add_options_page().
Here's the full code:
/** Step 3 (page html). */
function my_menu_html() {
  echo '<h1>Hello, World!</h1>';
}

/** Step 2 (add menu item). */
function my_plugin_menu() {
  $page_title = 'My Plugin Page';
  $menu_title = 'My Plugin';
  $capability = 'manage_options'; // Only users that can manage options can access this menu item.
  $menu_slug  = 'my-menu'; // unique identifier.
  $callback   = 'my_menu_html';
  add_options_page( $page_title, $menu_title, $capability, $menu_slug, $callback );
}

/** Step 1 (action). */
add_action( 'admin_menu', 'my_plugin_menu' );
We need to assign this function to the admin_menu action (step 1).
The HTML code is rendered by a callback, my_menu_html() in the example (step 3).
# 1.1. Understanding the arguments
Let's understand the arguments of add_options_page():
- Page Title: The title on the browser tab;

- Menu Title: The title on the sidebar menu;
- Capability: The permissions, who can see and access the page;
- Menu Slug: An unique identifier for our menu item;

- Callback: Renders the page's HTML;
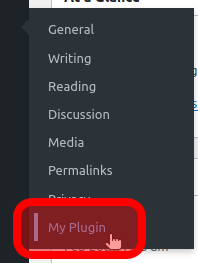
# 1.2. Permissions
The manage_options capability allows anyone with access to the "Settings" menu to access your page. This means regular users (not admins) can access your menu.
If you don't want regular users accessing your menu, you must replace it with a more restrictive permission.
You can find a list of all permissions here: https://wordpress.org/support/article/roles-and-capabilities (opens new window)
# 1.3. Other core menus
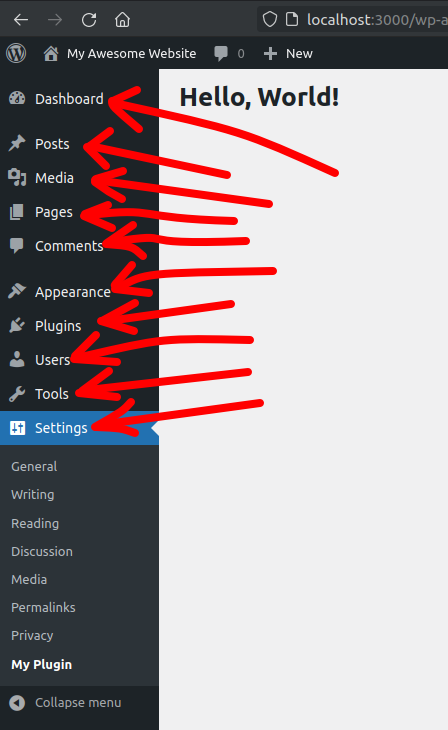
We added our item in the "Settings" menu. To add in other menus use a different add_*_page():
- Dashboard:
add_dashboard_page(...) - Posts:
add_posts_page(...) - Media:
add_media_page(...) - Pages:
add_pages_page(...) - Tools:
add_management_page(...) - etc
They all have the same syntax as the Settings menu.
Later, we will see how to create a custom parent menu.
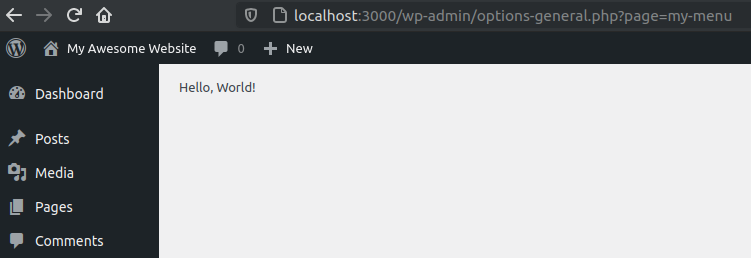
# 2. The page HTML
So far we created this simple HTML page:
Let's replace it with a full form:
First, let's create a basic form:
<?php
function my_menu_html() { ?>
  <form method="post">
    <input type="text" name="field1" value="" />
    <input type="submit" value="Save Changes" />
  </form>
  <?php
}
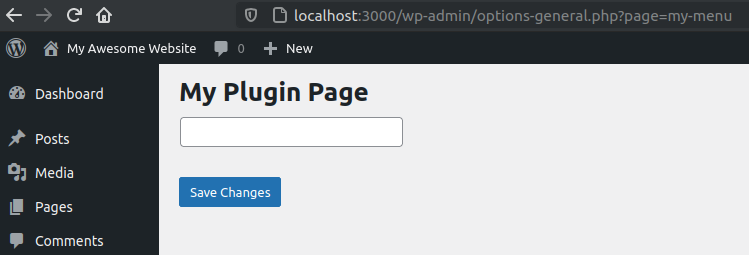
That's how it looks:
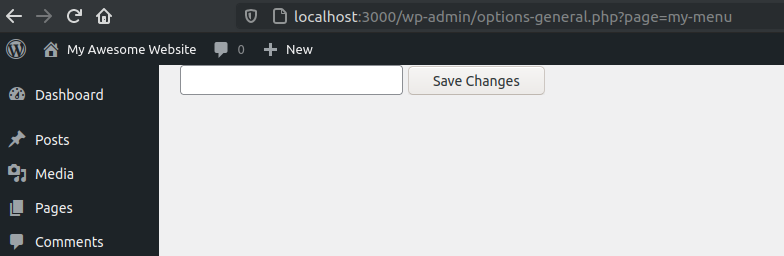
It doesn't look nice, but the form is there.
# Basic elements: Page title, Labels, Sections
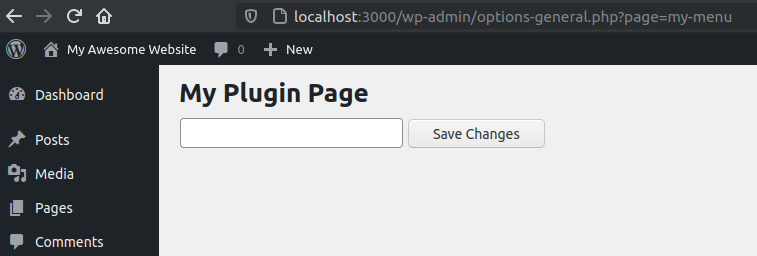
# Page title
Add it as a <h1>:
<?php
function my_menu_html() { ?>
  <h1>My Plugin Page</h1>

  <form method="post">
    <input type="text" name="field1" value="" />
    <input type="submit" value="Save Changes" />
  </form>
  <?php
}
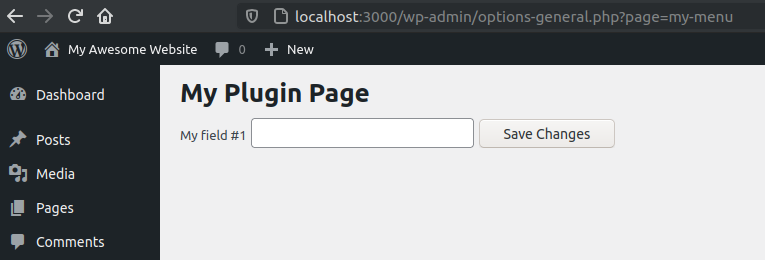
# Field Labels
Add as <label>:
<?php
function my_menu_html() { ?>
  <h1>My Plugin Page</h1>

  <form method="post">
    <label for="field1">My field #1</label>
    <input type="text" name="field1" value="" />

    <input type="submit" value="Save Changes" />
  </form>
  <?php
}
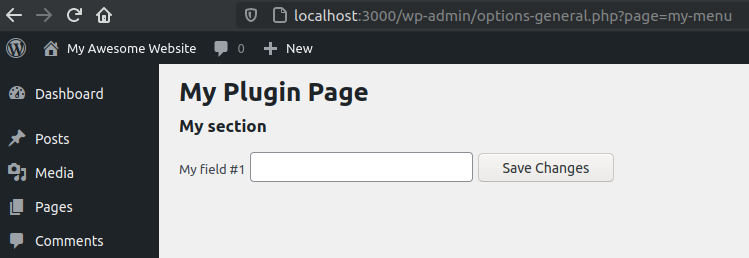
# Section
For sections, a sub-title for a group of fields, use the <h2> tag:
<?php
function my_menu_html() { ?>
  <h1>My Plugin Page</h1>

  <form method="post">
    <h2>My Section</h2>
    <label for="field1">My field #1</label>
    <input type="text" name="field1" value="" />

    <input type="submit" value="Save Changes" />
  </form>
  <?php
}
# Page wrap
Wrap your pages into a <div class="wrap">. This will add some default styling for basic elements:
<?php
function my_menu_html() { ?>
  <div class="wrap">
    <h1>My Plugin Page</h1>

    <form method="post">
      <h2>My Section</h2>
      <label for="field1">My field #1</label>
      <input type="text" name="field1" value="" />

      <input type="submit" value="Save Changes" />
    </form>
  </div>
  <?php
}
Cool stuff! Our page doesn't look exactly like the core settings pages, but it is enough to learn about the mechanics of a settings page. Later we will see how to improve the layout.
# Form Helpers
Let's reduce our code with some core helpers.
Button: Use submit_button() to print the button:
<form method="post">
  <input type="text" name="field1" value="" />
  <?php submit_button() ?>
</form>
The helper outputs this for us:
<input
  type="submit"
  name="submit"
  id="submit"
  class="button button-primary"
  value="Save Changes"
/>
Page title: Use get_admin_page_title() to get the page title:
<h1><?php echo get_admin_page_title() ?></h1>
That's better than hardcoding the title and the button.
# Final HTML
<?php
function my_menu_html() { ?>
  <h1><?php echo get_admin_page_title() ?></h1>

  <form method="post">
    <input type="text" name="field1" value="" />
    <?php submit_button() ?>
  </form>
  <?php
}
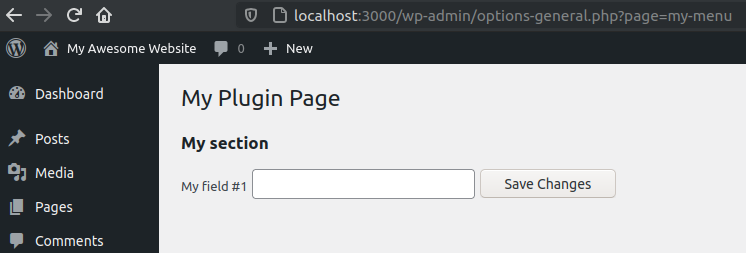
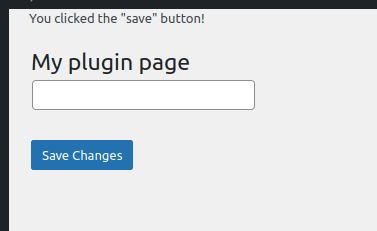
That's how it looks now:
NOTICE
I removed the layout elements (wrap, label, section) for simplicity sake.
# Submitting
Because our form has no action set, the data is sent back to the same page.
Let's show a message when the user clicks on the save button.
<?php
function my_menu_html() {

  // Submit button has been pressed (button name is `submit`).
  $has_submitted = isset( $_POST['submit'] );
  if ( $has_submitted ) {
    echo 'You clicked the "save" button!';
  }

  // Page HTML.
  ?>
  <div class="wrap">
    <h1><?php echo get_admin_page_title() ?></h1>

    <form method="post">
      <input type="text" name="field1" value="" />
      <?php submit_button(); ?>
    </form>
  </div>
  <?php
}
Click on the "save" button to test the code.
Now, we need a way to save and retrieve the form fields. In the next article, let's see how to do this using the Options API.