Publishing your first WordPress Plugin with GIT and SVN
When publishing your plugin to the official WordPress repository, you HAVE to use SVN. As for September 2019, WordPress doesn't support GIT repos.
Using SVN instead of GIT (as your code version control) wouldn’t be more than a mere inconvenience if it wasn’t for the fact that WordPress’ SVN is not meant to be used as a code version control. You need to use something else for this, like GIT.
From WordPress’ official page (opens new window):
SVN and the Plugin Directory are a release repository. Unlike Git, you shouldn’t commit every small change, as doing so can degrade performance. Please only push finished changes to your SVN repository.
So, if you want to have a code version control (you should have one), you need to set it up separately. Even if you like SVN more than GIT, you must set an additional SVN repo just for your code version control. You can’t use WordPress’ SVN for code control.
In this tutorial, I will show you how to use GIT and SVN together, in an organized way. GIT for code control and SVN for publishing only.
# 1. Your current development structure
I am 100% sure you are working in a structure like this:
my-project
└── wp-content
    └── plugins
        └── my-plugin
            └── my-plugin.php
The my-project folder is a full WordPress installation, used as a shell for your plugin development.
my-plugin is your actual plugin folder. It’s where all development happens.
And obviously, my-plugin/my-plugin.php is the plugin’s entry-point.
# 2. The plan
Our final folder structure will be:
my-project
├── working-env
│   └── wp-content
│       └── plugins
│           └── my-plugin
│               ├── .git
│               └── my-plugin.php
└── svn
    ├── assets
    ├── branches
    ├── tags
    └── trunk
        ├── .git
        └── my-plugin.php
The working-env folder is our WP installation, just renamed. It is still where we do all our work. Notice that we have initialized GIT on my-plugin, which means the plugin folder is the only thing on GIT. We don’t need to keep the whole WP instance on version control nor make backups of it. In case we need to restore the project (ex. install it in a new machine), we re-create “working-env” from a brand new WP installation and clone the GIT repo in the “my-plugin” folder.
The svn folder is only used for deployment. It has the 4 standard SVN folders: assets, branches, tags, and trunk. This structure is automatically generated by WordPress once we clone the SVN repository. We don’t need to keep this folder on GIT nor make backups of it. Even if we destroy the entire “svn” folder, we can always restore it from the SVN repo. A quick explanation about its structure: the assets folder contains images displayed on the plugin’s page (screenshots, banners and plugin icon). The trunk folder is the current stable version that is available for download on WP.
The workflow is: we work on “my-plugin” (“working-env”) and once is tested and ready for deploy, we update the “trunk” folder (with “my-plugin” files), and we call the svn command to submit.
# 3. Preparing your code for publishing
Once your first version is tested and ready to be published, we need to set up the readme.txt file (as per WP’s official guide (opens new window)).
We don’t have our GIT and SVN set up yet, but don’t worry – we will do after preparing our code for publishing.
# 3.1. Know the rules
Read the rules for publishing. It only takes a few seconds and you will discover a lot of things that are not allowed (like having a jQuery library on your plugin): https://developer.wordpress.org/plugins/wordpress-org/detailed-plugin-guidelines/ (opens new window)
# 3.2. Choosing a name
Our plugin must have a name and it must follow these rules:
- Must be unique: Check the WP plugin directory (opens new window) to see if there’s another plugin with the same name as yours.
- Trademark infringement: Do not use trademarks like “Facebook” in your plugin’s name. It is not allowed. For example, “Facebook Sign-Up” is not okay. If you really want to put a trademark on the name, read rule #17 (opens new window) – there are some ways to do it.
- Bad words: Not allowed at all.
- You can’t rename the plugin: So choose the name wisely.
# 3.3. Edit readme.txt (most IMPORTANT step!!!)
Before publishing your plugin, you MUST edit the readme.txt file. It seems a silly thing to do, but this file actually governs many aspects of the plugin.
The readme file defines the plugin name, version and other control information used for updates and repository management. This file is also the first thing the users will see when looking for plugins on the WP directory (description, screenshots, etc).
If you created your plugin with WP-CLI, you should have a “readme.txt” file with a full example ready to be edited.
WARNING
Important fields you NEED to set:
- Version (stable tag): Same as in “my-plugin.php” headers (ex. “0.1.0”);
- License (ex. MIT, GPL2, etc): Must be a GPL-compatible license (opens new window);
- Changelog: Set a “0.1.0: First version”;
- Screenshots: NO SCREENSHOTS for now – just remove this section (even if you have it, we can only define this section AFTER submitting our plugin for the first time);
- Plugin name / Short description / Long description, Author (contributors): Your moment to shine.
For a complete list of all fields (and for a full example): https://developer.wordpress.org/plugins/wordpress-org/how-your-readme-txt-works/ (opens new window)
Test your final readme.txt file here:
https://wordpress.org/plugins/developers/readme-validator/ (opens new window)
# 4. Create an SVN repository on WordPress
Once your readme.txt is ready, let’s create an empty SVN repository on WordPress:
- ZIP your plugin files (except the .git folder if exists);
- Name it as
my-plugin.zip(change “my-plugin” to your plugin’s name); - Test the ZIP file by manually installing the plugin into a different WP installation (Plugins > Add New > Upload Plugin > my-plugin.zip);
- Submit your ZIP file to review: https://wordpress.org/plugins/developers/add/ (opens new window);
WARNING
It can take a few days for your plugin be reviewed. Once approved, you will receive SVN credentials on your email.
WARNING
Once approved, the SVN repo will be empty. They won’t prefill it with your plugin.
# 5. Setting GIT
While you wait your plugin be approved, let’s set GIT on wp-content/plugins/my-plugin.
# Gitignore
If you have used wp-cli, you don’t need to do anything: there will be a .gitignore in your folder. If you haven’t used it, then you will need one:
.DS_Store
wp-cli.local.yml
node_modules/
vendor/
*.zip
*.tar.gz
composer.lock
*.log
phpunit.xml
phpcs.xml
.phpcs.xml
PS: I prefer to remove the composer.lock line as I want it on git control. As per official Composer documentation, composer.lock should be in the version control as well as composer.json (but never vendor).
# Init your git repo locally
cd wp-content/plugins/my-plugin
git init
git add -a
git commit -m "my first commit"
# On GitHub (GitLab, etc), create a repo, submit the files
On GitHub, follow the second set of instructions, "Push an existing repository...":
cd wp-content/plugins/my-plugin
git remote add origin https://github.com/username/new_repo
git push -u origin master
# 6. Move your WP installation from my-project to my-project\working-env
mv my-project working-env
mkdir my-project
mv working-env my-project
Check the structure:
cd my-project
ls
    working-env
# 7. Clone your SVN (it will be empty – they don’t pre-fill it with your zip files)
Once the plugin has been approved and you get the SVN credentials on your email:
cd my-project
svn checkout --depth immediates https://plugins.svn.wordpress.org/your-plugin-name svn
Update code (should be empty, but just in case):
cd svn
# /svn
svn update --set-depth infinity assets
svn update --set-depth infinity trunk
Structure of my-project/svn:
# /svn
ls
    /assets/
    /branches/
    /tags/
    /trunk/
PS: assets is where you put the icon/banner/screenshots for your WP’s plugin page. It is not where you put your plugin’s JS/CSS/images.
# 8. Create a folder for the screenshots/icon/banner (.wordpress-org)
It’s a good idea to have this folder even if you don’t have yet screenshots / icon / a banner for your plugin page on WP’s directory.
# /working-env/wp-content/plugins/my-plugin
mkdir .wordpress-org
Now, make sure this folder is not going to be sent to SVN inside our code tree (we will manually push them to /assets along trunk and others).
Open .distignore and add the line .wordpress-org anywhere (at beginning or bottom for example):
# /working-env/wp-content/plugins/my-plugin
nano .distignore
# .distignore
.wordpress-org
...
PS: You can name this .wordpress-org folder anything you want actually, but I prefer .wordpress-org because it is used by many other plugins.
# 9. Tweak .distignore
While you have .distignore opened, remove these two lines:
vendornode_modules
While sending these folders to SVN can cause security issues to your plugin, the security issues are for dev dependencies only and we are going to manually re-generate these folders on production mode, so it is safe to send them to SVN.
Also, add files/folders that you want to have on GitHub but not on SVN. Examples:
.github(GitHub files, like GitHub Action Workflow files);.vscode(VSCode editor settings);
# 10. [Optional] Add a screenshot for the plugin’s page
Steps:
- Take screenshots (any size, ex. 760×500);
- Save files on
.wordpress-orgfolder; - File names must be on this format:
screenshot-#.jpg (or png)
WARNING
Valid file names: screenshot-1.jpg, screenshot-2.png.
Invalid file names: main-screen-1.jpg, menu-items.png.
Change “Screenshots” section on readme.txt:
== Screenshots ==

1. This is a screenshot description
2. This is a description for the second screenshot
TIP
Official Guide: https://developer.wordpress.org/plugins/wordpress-org/plugin-assets/#screenshots (opens new window)
# 11. [Optional] Add Icon and Banner to the plugin page
Icon (official guide here (opens new window)):
- Put files on
.wordpress-orgfolder; - Set filenames accordingly (ex.
icon-256x256.png– see guide for different formats); - No need for
readme.txtchanges;
Banner:
# 12. [FINAL STEP] Submit plugin
Go to the project root:
cd my-project
ls
    working-env
    svn
Get a clean copy from GIT and save it as temp-git. This will be the production version, with no dev code:
# /
git clone https://github.com/username/my-repo-name temp-git
Our root structure will be:
# /
ls
    working-env
    svn
    temp-git
Compile production code for your project:
# /
cd temp-git
composer install --no-dev
npm install --production
Sync SVN/production code (copy code to trunk, ignoring files in .distignore):
# /
cd svn
rsync -rc --exclude-from="../temp-git/.distignore" "../temp-git/" trunk/ --delete --delete-excluded
Copy files from .wordpress-org to SVN (plugin’s screenshots, icons, banner):
# /svn
rsync -rc "../temp-git/.wordpress-org" assets/ --delete
Add files to the SVN control:
# /svn
svn add . --force
svn status | grep '^\!' | sed 's/! *//' | xargs -I% svn rm %@
Create your first version tag (ex. 0.0.1):
# /svn
svn cp "trunk" "tags/0.0.1"
Fix screenshots MIME types (to avoid downloading them when clicking):
# /svn
svn propset svn:mime-type image/png assets/*.png || true
svn propset svn:mime-type image/jpeg assets/*.jpg || true
Submit your SVN to WP:
# /svn
svn ci -m 'Adding first version of my plugin'
Remove svn and git-temp folders as they won’t be used anymore:
# /svn
cd ..
# /
rm -Rf temp-git
rm -Rf svn
TIP
Congratulations! Your plugin is now publicly available for download.
# Updating your plugin
Do your changes to working-env and test them. Once you are ready, you can proceed.
# Update the version
In this example, let’s change the version from 1.0.0 to 1.0.1.
Change 2 files: readme.txt and my-plugin.php. Don’t forget to add a Changelog entry to readme.txt.
# Push to GIT
Go to my-plugin folder:
cd working-env/wp-content/plugins/my-plugin
Add files, commit, and push:
git add -i
git commit -m "some changes"
git push origin master
# Submit the new code
Follow step 11, changing the version number to your current version number.
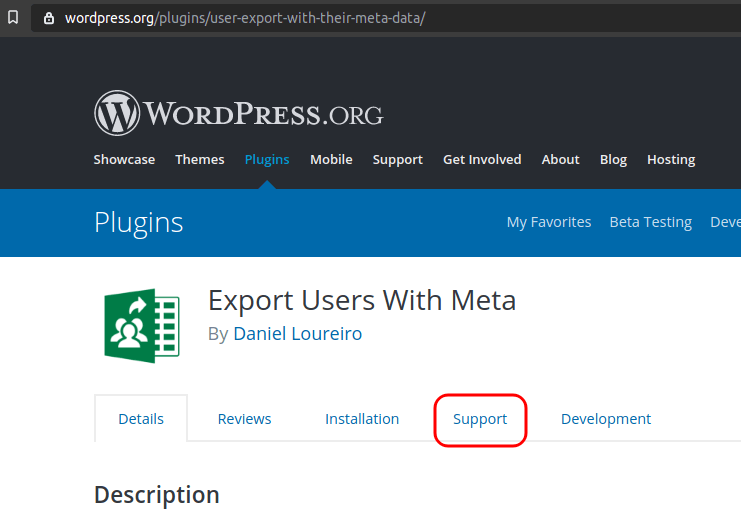
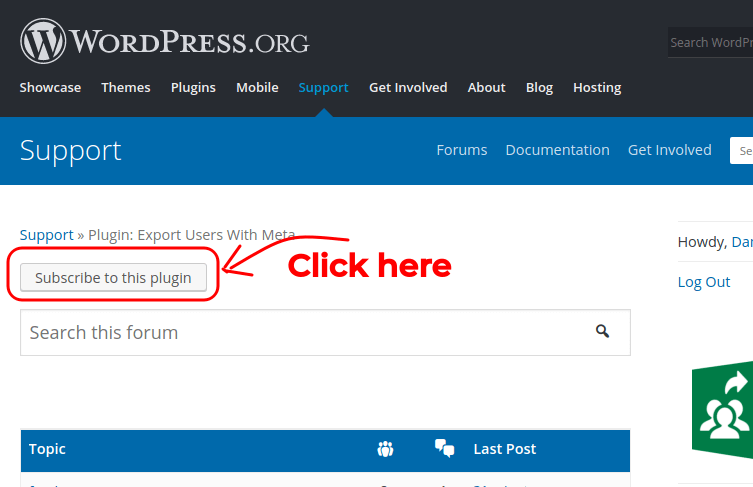
# Getting Support Notifications For Your Plugin
To receive email notifications when your users submit support requests:
- Open your plugin page (ex. https://wordpress.org/plugins/user-export-with-their-meta-data (opens new window))
- Click on the “Support” tab:
- Click on “Subscribe to this plugin”:
Done!